")
The removal of window tinting is commonly considered as a mere inversion of the process of installation. This is a misconception. Whereas installation is a constructive process that is dependent on accuracy and hygiene, the tint removal process is a deconstructive battle against chemical degradation and material breakdown.
Whether you are dealing with a bubbling rear window, fading dyed film that has gone purple, or just a simple upgrade to a higher-performance ceramic, the process poses certain risks to the glass and interior of the vehicle. This needs a tactical approach to detach the polyester window tinting films from the glass without leaving behind a stubborn residue of adhesive or harming critical parts such as defroster lines.
Why DIY Window Tint Removal Requires a Strategic Approach
The three common failure modes that motivate the removal of window tint are adhesive failure (bubbling), dye destabilization (fading/purpling), or legal compliance. Nonetheless, the distinction between an effective removal and a nightmare of hours of scraping is in the knowledge of the material condition of the film.
“Ripping it off” is not a strategy; it is a formula to leave the adhesive layer stuck to the glass and peel off the laminate topcoat. Manufacturing-wise, the chemical composition of the mounting adhesive and its exposure history determines the difficulty of removal. With time, the adhesives of lower quality cross-link under the influence of UV rays, essentially crystallizing on the surface of the glass. The safest route is a professional removal strategy which involves heat and solvents to soften this bond; then, mechanical force is used to remove the film and adhesive as a unit whenever possible. While many attempt DIY methods, realizing when to seek professional assistance can save your glass.
Assessing Your Film Type Before Starting
Before applying heat or blades, one must identify the substrate being removed. The physical properties of the film—specifically its tensile strength and heat rejection capabilities—will dictate the removal methodology.
Dyed Films: The Brittle Challenge
Standard dyed films, especially older generations, which are used in the economy segment, are based on dye impregnated into the polyester layer. These films are highly degraded by UV over years of exposure to the sun. The outcome is plasticity loss.
You can hardly peel an old dyed film, it tends to act like dried paint instead of a sheet of paper. It is brittle and can easily break or peel off into thousands of tiny pieces. In the case of these films, the emphasis of the strategy should be on heavy moisture saturation. You must add steam or water so that the film becomes pliable to be pulled in bigger strips. When the film is dry, tensile stress of pulling will be more than the material cohesive strength and therefore it will break.
Ceramic Films: The High-Heat Barrier
Ceramic films pose another engineering problem. They are thermally insulative since they are specifically designed to block infrared (IR) heat. A high-quality ceramic film will in fact prevent the heat on the outside of the glass from transferring to the adhesive layer when a heat gun (or even a high-powered hair dryer) is used on the outside to soften the glue on the inside. This necessitates a change of method. It might require you to use heating more or work within the inside of the glass (cautiously) to get the thermal energy to the adhesive bond. In case the adhesive is not heated enough, the high tensile strength of the ceramic film will enable you to remove the film successfully, but it will leave the adhesive layer completely attached to the glass, which will increase your cleaning time twofold.
The Essential Toolkit: Tools That Protect Your Glass

The difference between a professional result and damaged glass often comes down to metallurgy and chemistry.
- Heat Source: A commercial-grade steamer is superior for rear windows; a variable-temperature heat gun is standard for side windows.
- Scrapers (The Critical Distinction): You must use stainless steel single-edge razor blades. Do not use carbon steel blades. Carbon steel is harder than automotive glass and can easily scratch it. Stainless steel is softer than glass, allowing it to glide over the surface and cut through adhesive without etching the window.
- Plastic Razor Blades: Essential for rear windows with defroster lines where metal is prohibited.
- Adhesive Remover: A dedicated citrus-based solvent or isopropyl alcohol solution.
- Abrasives: 0000 (Super Fine) Steel Wool or a Scrub Pad (White/Non-abrasive).
- PPE: Nitrile gloves are necessary to protect hands from solvent absorption and hot glue.
Crucial Pre-Step: Safeguarding Your Interior From Moisture and Chemicals
The process of removing tints on windows is wet and messy. The solvents that are used to dissolve glue may cause permanent damage to interior trim, and electronics may be destroyed by water runoff.
- Electronics Shielding: Current car doors have sophisticated electronic window, lock and mirror modules. The main cause of the failure of the module is water flowing down the glass and into the door seal. You need to apply masking tape to close the space between the door panel and the window rubber. Tape all window switches with plastic or waterproof tape.
- Moisture Absorption (The Soak Shield): A soak shield is a braided absorbent rope (also known as a soak shield) that is installed inside the bottom of the dashboard or the rear deck. This captures the large amount of water and steam condensate that drips down the glass, and does not soak into the dashboard foam or get to the ECU behind the kick panels.
- Leather and Fabric Protection: The majority of adhesive removers are solvent-based. When these chemicals fall on leather seats, they may remove the dye or dry up the material. When they drop onto plastic instrument clusters, they may result in instant etching or clouding. Cover the seats, dashboard and door panels with plastic drop cloths or masking film before opening a single bottle.
Mastering the Removal Methods: Steam vs. Heat

There are two primary thermodynamic approaches to breaking the adhesive bond: moist heat (steam) and dry heat (heat gun/solar).
The Steamer Method (Best on Rear Windows)
The steamer is the gold standard in rear windows and older brittle films.
1. Procedure: Press the steamer head on the film in small sections. The steam accomplishes two tasks, firstly the heat (around 100 °C) softens the adhesive and secondly, the moisture enters the microscopic pores of the older films, re-hydrating the material.
2. The Pull: When you have a corner raised, push the steam between the film and the glass as you pull.
3. The Advantage: The moisture ensures that the adhesive is stuck to the film and not the glass. More to the point, steam is not as harsh on defroster lines as dry heat, which minimizes the chances of moving the metallic heating elements.
The Heat Gun Method (Best on Side Windows)
A heat gun provides a high level of control with high temperature, which is suitable in tempered side glass where defroster damage is not an issue.
1. Temperature Control: Turn the gun to medium. Heat the outside of the glass and peel off the inside. This warms the adhesive on the interface of the glass.
2. Thermal Shock Warning: Be highly sensitive of environmental conditions. When it is cold, a concentrated heat applied to a single point on a cold window may result in a thermal shock, which will cause the glass to break immediately. It is always advisable to heat the whole panel of the glass at a slow pace and then concentrate on particular regions.
3. High Humidity Conditions: When the glue is subjected to high humidity, it will not be soft but sticky. Here, a little less heat would enable the adhesive to be tacky enough to adhere to the film when it is removed.
The Trash Bag Method (Solar Absorption)
To the unprofessional, this process makes use of the solar energy. Wipe the inside of the window with soapy ammonia solution. Wet film should be covered with a black trash bag cut to shape. Park the car in the open sun, 60-90 minutes. The black plastic absorbs the sun radiation and forms a greenhouse effect between the bag and the glass. The ammonia assists in dissolving the adhesive chemically and the heat makes it soft. It is tedious, yet tends to peel the film off in a sheet.
Protecting the Critical Zones: Defroster Lines and Antennas
The most high-stakes part of the vehicle is the rear windshield. It has printed silver-ceramic conductors of the defroster and radio antenna. These are lines that are raised on the surface of the glass.
- Parallel Pulling Vector: When peeling film across these lines, never peel the film across the lines. Always draw parallel with the defroster lines. Pulling perpendicular forms a lifting force that may be used to delaminate the conductive material off the glass and permanently destroy the defroter.
- The “No Blade” Rule: Do not apply a metal razor blade to a window that has defroster lines. You will cut off the electric connection.
- Cleaning: In case the lines have adhesive, soften it with chemicals and then use 0000 steel wool (gently) or a plastic razor blade to rub the residue along the direction of the lines.
Total Adhesive Elimination: Chemicals vs. Mechanical Cleaning

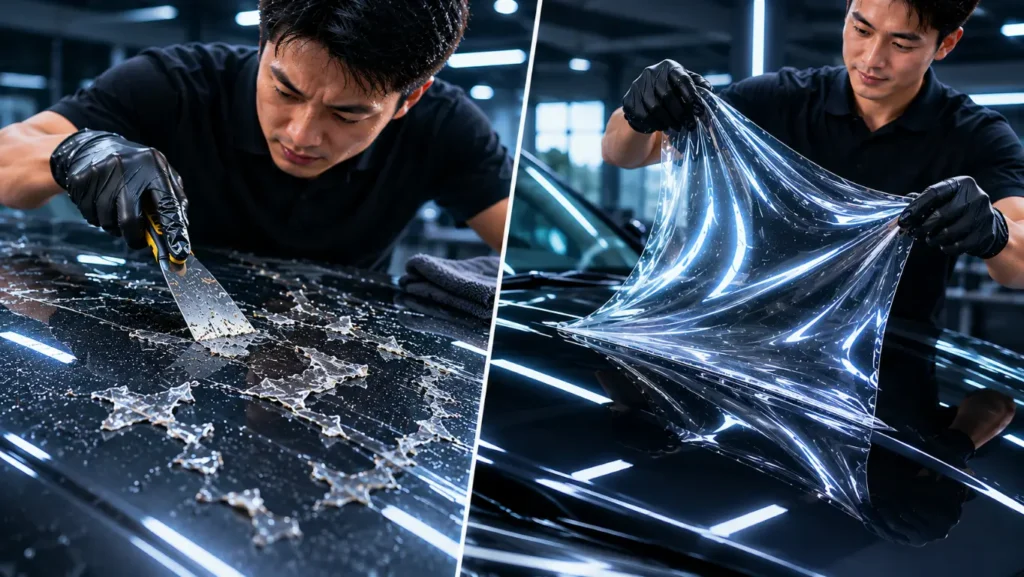
Once the film is removed, you will likely be left with residue—either “spotty” patches or a full layer of glue.
- Chemical Selection:
- Citrus-based cleaners: Effective and generally safer for respiratory health, but require longer dwell times to break down the glue.
- Isopropyl Alcohol (91% or higher): Fast-acting. It cuts through grease and dries out the adhesive, making it pill up.
- Soap and Water: Useful primarily as a lubricant for scraping, not a solvent.
- The “Dabbing” Technique: This is a manufacturer’s secret. Before spraying chemicals, take a ball of the removed tint (adhesive side out). Press it against the remaining glue spots on the glass and pull it off quickly. The fresh adhesive on the old film will often bond to the residue on the glass and lift it off cleaner than scraping.
- Clay Bar Finish: After all visible glue is removed, the glass may still feel rough. Use an automotive clay bar with lubricant to remove microscopic particles embedded in the glass pores. This ensures the surface is surgically clean for the next installation.
Breaking the Cycle: Why Quality Manufacturing Prevents Removal Headaches
If you have just spent three hours scraping crystallized glue from a rear window, you are experiencing the downstream effects of poor manufacturing. The difficulties encountered during removal—excessive adhesive residue, film fragmentation, and layer separation—are symptoms of low-grade pressure-sensitive adhesives (PSA) and unstable dying processes.
It is vital to break this cycle by selecting a product engineered for chemical stability.
The Science of “Easy-Off” Adhesives: BASF & Ashland Excellence
Low-end window films make use of generic acrylic adhesives that deteriorate during years of thermal cycling. They become hard, discoloured and permanently fixed on the glass substrate.
FlexiPPF approaches material science differently. We use American Ashland adhesives, which are known to be of the best initial tack and stability. This bonding system is combined with German BASF polyester bases forming a composite structure, which is not easily broken down by chemicals.
This combination makes the film to be structurally sound even at extreme temperatures up to 80 o C. More to the point, the Ashland adhesive is designed to be long-term pliable. In case you want to remove or replace the film several years later, the chemical bond is the same, and the removal can be done in a clean and single piece, leaving a small amount of residue on the glass. This is the characteristic of high-quality engineering, its serviceability.
See the difference superior engineering makes when it comes time for removal:
| Feature | Generic Window Film | FlexiPPF Premium Film | Your Benefit |
| Adhesive Source | Generic Acrylic PSA | American Ashland Adhesive | Stable bond that peels off cleanly, even after years. |
| Base Material | Standard Polyester | German BASF TPU Base | Resists brittleness and snapping during removal. |
| Heat Tolerance | Degrades > 50°C | Stable up to 80°C | No “baked-on” crystallized glue residue on the glass. |
| UV Defense | Fades in 1-2 Years | 99% UV Block (5000+ Hrs Test) | Prevents the film from drying out and cracking. |
| Removal Experience | Shreds into pieces | Single-Piece Peeling | Saves hours of labor and scraping. |
Performance That Outlasts the Sun: 99% UV Protection
The reason many films become brittle and hard to remove is the failure of their UV inhibitors. When UV protection fails, the polyester substrate is cooked by solar radiation.
FlexiPPF integrates an advanced Nano Ceramic Coating that blocks 99% of harmful UV rays (UV400). This protects not only the vehicle’s interior but the film itself. By rejecting up to 65% of solar heat, the film keeps its own adhesive layer cooler, preventing the premature baking and crystallization that plagues lesser products. Our rigorous testing protocols involve 5000 hours of simulated UV radiation, ensuring that even after years of exposure, the film remains vibrant, bubble-free, and mechanically sound.
Beyond the Roll: 10-Year Warrant and Installation Support
As a window film manufacturer in the world, we consider the relationship with our customers to be a long-term partnership. We support our engineering with a 10-year warranty that is the best in the industry, which ensures that our products do not fade, bubble, or peel and require early replacement.
FlexiPPF is the infrastructure of success whether you are a DIY enthusiast and need the right product or a professional shop and need to save on labor time on removal and replacement. We have 24/7 technical support that can answer questions related to particular types of glasses or difficulties in their removal. Moreover, we have detailed installation video instructions and operation manuals, which will help you to attain factory quality finish each time.
By choosing a film built on superior raw materials, you are not just buying tint; you are investing in a product that performs flawlessly today and respects your vehicle’s integrity tomorrow.